
A Guide to the Full Wheel Pose, Urdhva Dhanurasana
- Irene Lomer

- Mar 19, 2023
- 14 min read
Updated: Nov 5, 2023
The Full Wheel Pose (Urdhva Dhanurasana) is challenging backbend that can take a few years of yoga practice to really understand.
Beginner yoga practitioners will usually start practicing the Bridge Pose (Setu Bandha Sarvangasana) and getting comfortable with lifting up the hips, engaging the legs, and opening through the shoulders, chest, and hip flexors.
However, many yoga practitioners struggle with the next step to progress from the Bridge Pose to the Full Wheel Pose. Often taking much longer to learn the Full Wheel Pose, if at all.
While others may start to practice the Full Wheel Pose but not fully understand how to get the most out of the posture and progress to more advanced variations.
We’ll therefore explore in a step-by-step approach how to:
Set up your foundation for practicing the Full Wheel Pose (Urdhva Dhanurasana) as a beginner
Understand and develop the Full Wheel Pose
Explore variations of the Full Wheel Pose and the One-Legged Full Wheel Pose (Eka Pada Urdhva Dhanurasana)
Best use counterposes after the Full Wheel Pose
Integrate the Full Wheel Pose into your home yoga practice
If you’re someone that first wants to try the practice out before reading about it you can follow my guided yoga sequence for the Full Wheel Pose.
I would however recommend to try the Full Wheel Pose a few times with the guidance of a teacher before practicing on your own. Remember this isn’t a beginner level posture and it can be tricky to come up into the pose safely if you’re not sure what you’re doing.
The Benefits of the Full Wheel Pose (Urdhva Dhanurasana)
Like the name implies the Full Wheel Pose focuses on moving your body into the shape of a wheel. It is a backbend that opens fully the front of your body.
Since most of our day is spent sitting in a posture that closes up our shoulders and chest, one of the big benefits of the Full Wheel Pose is that it works on doing the complete opposite.
Whether outside of our yoga practice we have a sedentary lifestyle or do other activities such as walking, cycling, and weight lifting there are few other activities that allow us to increase our flexibility around the shoulders and hips.
In addition to the physical benefits, the Full Wheel Pose (Urdhva Dhanurasana) can also help improve your ability to breathe fully and deeply.
When you’re beginning to practice the posture you might think it has the opposite effect! Since it can feel to start with quite difficult to breathe slowly and deeply when coming into the Full Wheel Pose.
But as you continue to practice and focus on your breathing you will find that your breath capacity will improve both in and out of the yoga pose.
Another benefit of building up towards practicing the Full Wheel Pose and its variations is that we are learning something new and challenging.
It can feel quite rewarding to have a goal of a difficult posture to practice and sometimes you might find that it encourages you to practice yoga more often.
Setting Up Your Foundation with Preparation Poses
The Full Wheel Pose is a deep backbend and therefore requires you to take some time to warm up and prepare for the posture before practicing it.
If you have lots of time, I recommend to first start with a series of Sun Salutations and perhaps some Standing Poses. These will help to warm up your body, focus your mind, and develop a steady rhythm with your breath.
You can then do a couple of specific preparation poses to help open and activate your core, shoulders, and hips.
Core Warm Ups and Hip Openers

Come down to lie on your back. Bringing your knees into your chest and keeping your hands and shoulders heavy.
Use an inhale to reach your feet up towards the ceiling. Exhale, and lower the legs all the way down to hover. Knees come into the chest on the inhale and reaching the legs up. Exhale, legs come down again.
Doing this for around 10 rounds and then changing to the opposite direction.
So legs come out on the exhale, inhale legs come up and knees come into the chest. Reach the legs away on your exhale and inhale legs come up again. If it does feel quite intense on the lower back bringing the legs so low, you could instead of reaching the legs right out, you could bring the legs kind of just halfway or keep the legs a little bent. Doing this one more time.

We'll now focus a bit more on opening the hips. So knees are coming wide and legs are going to extend.
Inhale legs come up, feet together and knees wide. Exhale as you extend and reach your legs up. Doing this for around 10 rounds and then we'll start to move the opposite way.
So legs are coming down on your exhale. Bring your feet together and knees wide, as you inhale and bring your feet in towards you. Repeating in this direction for another 10 rounds.
And then you can just bring your knees into the chest. Rock a little side to side and then from here inhaling coming up to sitting. Great!

Come over to your hands and knees to prepare for a Low Lunge to open your hip flexors. If you've got a block you could experiment with putting a block or a cushion under the back knee. This will help to deepen the stretch in your hip flexors. For the Full Wheel Pose, we really need that space here through the front of the hip flexor. So we're working on creating that space now.
Place your left knee either on the block or on the ground and step your right foot forward. Your left foot can be tucked or extended. Personally, with the extra height of the block, I prefer the foot tucked here.
Hands can be on the hips and you're just taking around five slow and steady breaths.
If you’ve got the space you could try sinking your hips a bit more forward and stepping your right foot a little further away from your left leg. Particularly if you notice that your right knee is coming right over your right heel, it's a nice indication that you can step the foot wider and have a little bit more space here.
And then you can exhale release and change sides. Staying here another five breaths.
So the block comes under the right knee, left foot steps. I personally prefer these kind of softer foam blocks since it gives a little bit of cushioning here to the knee.
If you've got harder cork blocks and it feels uncomfortable, you could try putting a cushion between the block and your knee.
Shoulder Strengthening and Opening

We're now going to do a little bit with the shoulders. So you can come with your hands interlaced and elbows shoulder distance apart.
From here you're going to lift up through your hips. So you're on the balls of your feet, bending the knees, and seeing if you can send your upper body back towards the legs.
So by having the heels super high and the knees a little bent, it will create more space here to draw the front of the torso towards the front of your thighs. You're engaging your shoulders, you're lifting up out through the shoulders here.
And then you can exhale release and rest for a few breaths in your Child's Pose.
Once you’re ready repeat this shoulder strengthening posture one more time and again follow with a few breaths in Child’s Pose.

Now we’re going to open the shoulders. You could use blocks here or if you don't have blocks some bit of furniture like the arm of a sofa.
The elbows are going to be on the blocks or arm of the sofa and your hands are together. See if you can bring the knees a little back and sink the chest and head down.
If your head touches the floor and that feels nice you can do that. While if your head is more up that's also fine here. So we're lengthening through the front of the shoulder and front of the arms here. Staying for around five breath.
You can slowly come up. Just coming to your elbows, do a couple of shrugs here of the shoulders. And then if you like, repeating this posture one more time.
You could play with having the fingertips either reaching right up to the ceiling or drawing the hands towards the back of the neck. You'll find it kind of targets different parts of the shoulder. For me with the hands coming more to the neck that's a little tighter but also a little bit more intense.

We’ll continue opening the shoulders. Come to your hands and knees, making sure your knees are under your hips. Then start to walk your hands a little forward and drop the chest down.
Now if this feels quite intense, your hands could be closer to your legs and your chest could be a little higher off the mat. It is quite a different posture than the Child's Pose. And then, if it feels comfortable, your arms might come a little forward.
Another thing you could play with, for a little bit less intense of a stretch, is to bring the hips forward. So instead of hips staying right above the knees, that's a little deeper for the back, you could allow your hips to move a bit more to the front.
Staying here for five to ten breaths.

Now we're going to come down onto the belly. So this is our last real preparation before we do the variations of the Full Wheel. The Bow Pose, Dhanurasana is really kind of an upside-down version of the Wheel Pose.
You're going to bend your knees and reach your hands back. If you can, you're holding your ankles here. If that’s not possible, do your best to hold your feet.
From here, you're pressing your feet towards your hands and starting to lift both your feet and chest a little up. Focusing on breathing as slows as you can in the posture.
If it's quite intense you could come in and out of the pose several times vs. holding the posture for five breaths. So you might exhale drop down and inhale lift back up again. And if you can staying here for five breaths.
And then slowly releasing. Coming back through the hands and knees and coming to Child's Pose.
How to Understand and Develop Your Full Wheel Pose
Before starting to practice the Full Wheel Pose, Urdhva Dhanurasana it’s important you already feel comfortable with the Bridge Pose.
Once you do feel that you understand and can breathe fully in the Bridge Pose its helpful to practice it as a preparation posture before attempting the Full Wheel Pose.

So you can come to lie down on your back.
Feet are hip distance apart here, and arms are alongside the body. You're pressing the feet and the shoulders down, and then on the inhale you're going to start to lift up through the hips. And if you can walk the shoulder blades a little together.
You might try interlacing the fingers here. So you're grounding through the back of the shoulders and you're lifting up through the chest. Keep the legs super active. Feet are heavy and knees are drawing towards your feet.
Try to keep the belly a little firm and stay here for around five breaths. If you like repeating this version several times.
You can then slowly release on your exhale and pause a few breaths with your knees bent and lower back heavy.
To begin with the Bridge Pose can feel quite heavy. See if you can notice what’s happening with your breath. Did it become a little shorter and less smooth? If so keep working on the Bridge Pose for a period of time until you start to create the space in the chest and can breathe slowly and with control.
Bridge Pose with Blocks
Another version of the Bridge Pose that can be helpful is a version with your feet on blocks. This will help you to create a little bit more space and length in your hip flexors.
If you don't have blocks you can just do the same thing with the balls of your feet on the mat and heels lifted.

Feet are grounding this time into the blocks or balls of the feet into the mat. Inhale, and start to lift up through the hips. Again try to walk the shoulder blades in, and interlace through the fingers. The toes are heavy, and the hips are lifting. Slow down the inhale and the exhale.
Again, work on building up to five slow breaths.
And then exhale slowly release. So you can just slowly drop the hips down maybe hug the knees into the chest. Just pause here for a couple of slow steady breaths.
Often you’ll find that practicing the same yoga pose twice helps to create a bit more space in the body. So if you like you could repeat this version one more time.
One Legged Bridge Pose
If you’re feeling comfortable with the Bridge Pose you could experiment with a One Legged Bridge Pose variation.

Inhale, start to lift up through your hips for the regular Bridge Pose. Now if you like here for a different positioning, you could place the hands under the lower back. So elbows are down, and the chest is lifting. This gives a little bit more height and space. If you don't like that so much you could again interlace these fingers behind the back.
Now this time you want to keep your left foot heavy as you exhale. On an inhale, your right knee comes into your chest and then reach your right leg up towards the ceiling.
As you lift your right leg up your right hip will want to naturally sink down. So see if you can resist this by lifting your right hip and extending your right leg up to the ceiling. Great!
After a few breaths you can slowly exhale drop that right foot down and then inhale as you change sides and lift your leg up. So left knee comes in and hips are high. Your left leg extends up.
You could just start with one breath on each side and then build up to staying five long breaths on each side.
And then exhale to release. Releasing the hands and dropping the hips down.
Variations of the Full Wheel Pose
We’ll now explore step-by-step a few different versions of the Full Wheel Pose.
Full Wheel Pose Head on Ground
Now we're going to move up towards the first variation of the Full Wheel Pose with the head on the ground. Feet are going to be flat on the floor and the setup is the same as the Bridge Pose.

Your feet can come a little bit wider, if you need that extra space, but try to avoid toes reaching right out. So if you need that extra space just walk both feet a little wider out to the side.
Lift up through your hips. And this time hands are coming back towards your shoulders. If your shoulders are a little tighter or you're new to the pose, try bringing the arms a little wider out to the side. So hands are roughly in line with the shoulders and as wide as your mat. Hands are down and elbows are lifted here.
If this feels uncomfortable you can stay repeating again the Bridge Pose with your fingers interlaced behind your back.
But if you feel quite comfortable here you might try to press your hands down and lift up through your chest. See if you can come to the crown of the head and get a little bit used to the possession here.
Please be careful here with your neck. Particularly if it’s the first time you’re trying this pose and you haven’t got the guidance of a teacher to help guide you into the posture.
Try to lengthen through the front of your hip flexors. Lengthen through your back and firm through your belly.
And then exhale dropping the head down, letting the back come down and just pausing here a couple of slow steady breaths.
Often it's the transitions you want to be careful about as well, not just the poses themselves. So watch out as you come in and out of the posture.
If you like you could repeat this version one more time, keeping your breath as slow and smooth as possible.
Full Wheel Pose
So we're going to try this time experimenting with how it feels to press up into the arms for the Full Wheel Pose.

All of these postures are in order of difficulty. So in case you still had some challenges with the previous version I suggest you keep practicing that for a while before progressing to this version.
So feet again are set up in the same way. Hands are down and a little out to the side. Really press down through your hands and feet. Lift up first through your hips on an inhale. And then from here coming up onto the crown of your head.
If this feels comfortable, see if you can press down with your hands and lift up through your chest. As you extend your arms you want to keep lifting up through your hips and activating your legs.
Now you could have the knees a little bent or you could try lengthening the legs and sending the weight of your chest a little forward and away from your feet.
Doing your best to slowly inhale and exhale. Building up to five or ten breaths.
And then exhale as you tuck your chin into your chest and drop the back of your head and hips down. Relaxing for a few breaths.
Like the other versions you could choose to repeat this several times.
One Legged Full Wheel Pose
Finally, once you feel comfortable in the Full Wheel Pose, you can play with a One Legged version. This is quite an advanced posture so don’t feel a rush to practice this in your first couple of years of learning the Full Wheel Pose.

You can bring again your feet flat on the floor. Hands come again a little wider to give you space in your shoulders. Now press into the ground with the feet and hands. Inhale, and lift up through your hips. Firm the belly, and come to the crown of the head. Inhale, and start to lift up through the arms for the Full Wheel Pose.
Now you want to keep your left foot is heavy and see how it feels to bring your right knee in. If you do feel any discomfort in your back or instability in the posture keep practicing the regular version of Urdhva Dhanurasana.
But if you feel ok you could try lifting your right leg up and extending it away from you. From here you can release your right leg slowly and try the same thing with the left leg. Breathing long and deep for as many breaths as you can manage.
And then exhale slowly releasing and coming out of the posture.
Counterposes to Balance Your Body After the Full Wheel Pose
After an intense backbend like the Full Wheel Pose its helpful to finish your practice with a few counterposes.

So you can start by bringing your knees into your chest. Allow your knees to be a bit wider and hold either your ankles or outside of your feet for the Happy Baby Pose.
Staying here for five to ten breaths. You could choose to stay still or if you like rocking from side to side.

From here bring your legs into your chest. Legs could be a little bent or legs could be lengthening for this Supine Forward Fold on your back.

Finally, you can lie down on your back. Allowing your legs to fall open to the side and palms to face upwards relaxing in Savasana for few minutes of rest.
Tips for Practice
I hope you found it helpful exploring different variations of the Full Wheel Pose. It's worth remembering that it's quite a challenging yoga posture.
So to begin with you might be just working on the preparation postures and variations of the Bridge Pose. Then over time, you can start by first finding the position of your hands which requires quite some opening and stability in the shoulder. Before exploring coming up into variations of the Full Wheel Pose (Urdhva Dhanurasana).
If you do have any lower back pain, I would suggest focusing a bit more on strengthening your core and staying a bit longer with the preparation postures. Helping you to avoid aggravating your lower back.
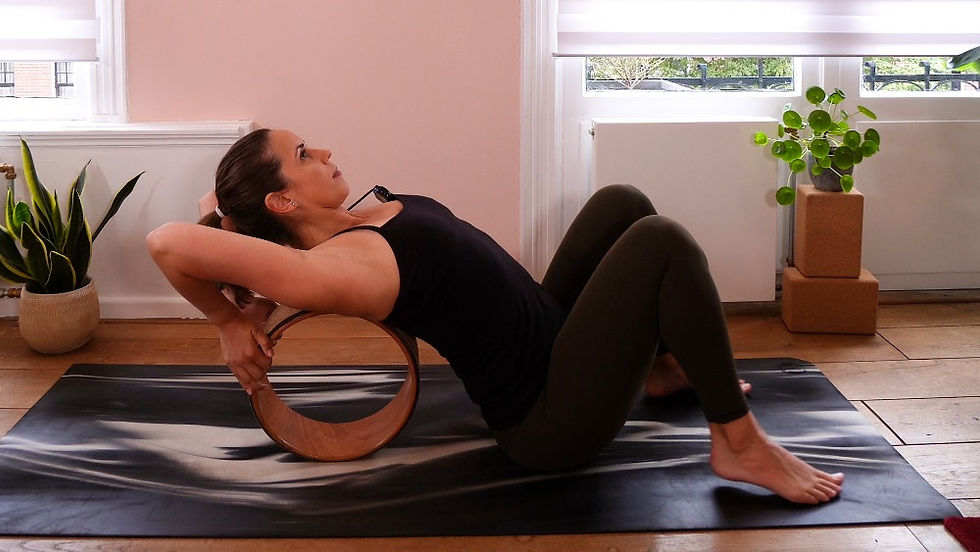
If you’re feeling that your biggest challenge of coming into the Full Wheel Pose is due to restriction and opening in your shoulders you could try using a yoga wheel to help open the front of your body.
And if you’re looking for another interesting variation of the Full Wheel Pose you could try exploring the Wild Thing Pose.
Happy practicing!
💛 Irene

Receive Personal Guidance from Irene
Would you like personal guidance to help dive deeper into your yoga practice?
Email Irene via info@antarayoga.nl to book your free consultation call and discuss what type of private class or corporate yoga would best suit your needs.

Start a Home Yoga Practice
Do you want to develop a home yoga practice but not sure where to start? Follow the three steps in this free guide to start practicing yoga consistently at home.
Complete your details below to receive your free guide with tips for a home yoga practice. In this guide you'll also receive cheat sheets and links to guided videos for seven short sequences, as well as a practice calendar to get started.


Comments