
7 Postures to Practice With a Yoga Wheel
- Irene Lomer

- Jan 22, 2023
- 6 min read
Updated: Mar 28, 2023
There are many different postures you can practice with a yoga wheel to cultivate flexibility, strength, stability, and balance.
In order to get the most benefits from using a yoga wheel it’s helpful to understand the main intentions for using a yoga wheel and the physical actions to focus on when practicing yoga poses with a yoga wheel.
Read on to find out more about the advantages of using a yoga wheel, a guide on how to use a yoga wheel effectively, and a routine of seven yoga postures with a yoga wheel.
You can also practice along with my yoga wheel online tutorial focused on backbends and chest openers.
What is a Yoga Wheel Used For? And is it Worth it?
The main purpose of a yoga wheel is to help open the front of your body. It’s therefore a particularly useful prop if you have tightness in your shoulders and chest and/or want to progress with deeper backbends.
Many of us spend too much of our time sitting and suffer from sore shoulders, tight chest muscles and backpain.
A yoga wheel can be used to help counteract tightness built up in our bodies from sitting in a posture that closes up the front of our torso. Allowing our shoulders and chest to open and become more flexible through supported backbends. As well as developing a stronger core, and overall improvement in our balance and stability.
Using props—like a yoga wheel—will allow you to approach yoga poses in a slightly different way than if you were doing them without the yoga wheel. Giving you the possibility to get new insights to the approach and technique of these yoga postures.

So if you don’t already have a yoga wheel is it worth getting one?
The simple answer is yes if you notice benefits from using your yoga wheel and start to use it regularly.
I would recommend a yoga wheel to anyone that wants to focus on improving their backbends and general flexibility around the shoulders and chest. And suggest that you aim to use it once or twice a week for a month to get familiar with using the wheel in a few specific yoga postures.
Guide to Using a Yoga Wheel
A yoga wheel can be a bit daunting the first time you use it. Given its shape it has the tendency to roll and so you want to make sure that the wheel doesn’t roll unexpectedly while you’re using it. Therefore, to use it safely you want to move slowly and steadily in and out of the yoga poses with the wheel. And give yourself the time to get familiar with using the wheel.
Depending on the length of your yoga practice you can decide to either use the yoga wheel for your entire practice or simply finish your yoga practice with a few backbend variations and shoulder openers at the end of your yoga practice.
The setup of the upper body is the same for most of these backbends with the wheel. So once you've got the basics for one posture with the wheel you can take your time to experiment a little with the positioning of your legs.
Yoga Wheel Routine
The following routine with a yoga wheel is focused on opening the shoulders and chest through supported backbends. The first two poses are focused on strengthening your core and opening your hips to ensure you get the most from backbends.
Core Warm Up With Wheel

Start by bringing your left leg over the wheel with your ankle resting over the edge. You can bend your right knee and come down to lie on the back. From here allow your left leg to extend actively and press it down onto the wheel. Your right leg can extend and lengthen down on the floor.
Inhale as you reach your right leg up and exhale as your right leg lowers down. We'll do this a few times. Inhaling as the leg lifts and exhaling as the leg lowers.
You might let your right leg hover rather than dropping to completely down. And trying to keep your lower back heavy throughout. After about 10 rounds you can repeat on the other side.
Hip Flexor Stretch With Wheel

Step your right foot forward over the yoga wheel and allow your right thigh to rest against the wheel. If you need you could walk the toes of your left foot a little back. The toes of the left foot could be tucked or untucked. So see what feels most comfortable here.
Allow on your exhale your hips to sink forward and down towards the wheel and then on your inhale see if you can lift your hips a little up. Moving back and forth gently with your hips as you breathe in and out.
After a few rounds of moving see if you can pause for a few breaths as you allow your hips to sink forward and open. And then slowly come back up on an inhale and change to the other side.
Backbend With Feet on Ground
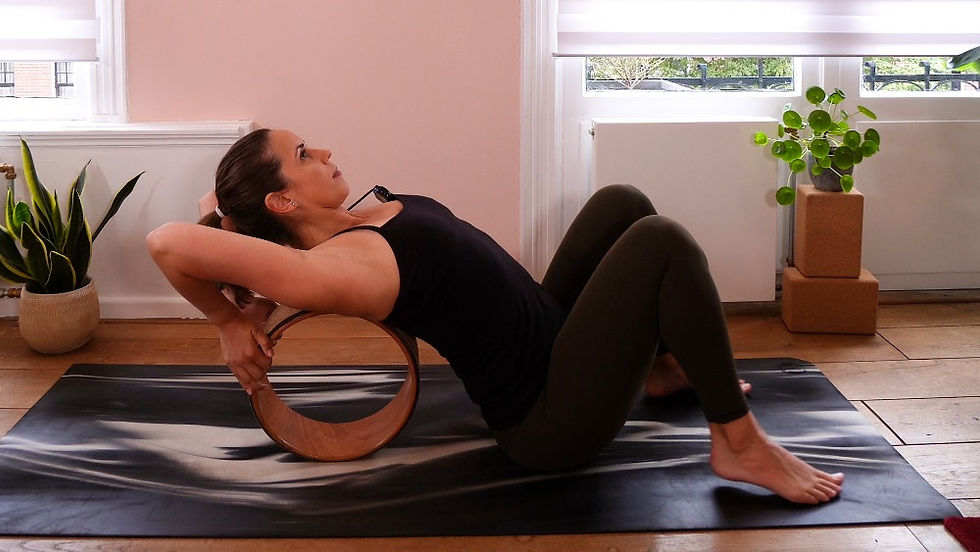
For this first backbend you want to place the wheel about halfway back in your mat and come to sit down with your back to the wheel, feet flat on the floor and legs bent.
See if you can keep the wheel pretty close to you with your hands holding the back of the wheel. If it feels comfortable, see if you can draw your elbows a little in towards each other to open the front of your chest.
Gradually start to lean a little back as you keep a nice firm grip on the wheel. Keeping your head in line with the rest of your spine. You can keep easing a little back as much as you like. And if it feels intense for the shoulders you could have the elbows a little bit more out and over time work on drawing them in. Staying here for around 5-10 breaths.
Backbend With Hips Lifted

If the previous pose felt ok and possible to stay for around 10 breaths you could try lifting your hips up. Keep pressing your feet into the ground as you allow your thighs and hip flexors to lengthen.
If you feel steady on the wheel you could try bringing your arms back behind you. Perhaps holding the back of the wheel under your head if there’s space in your shoulders. If this doesn't feel good and the head needs extra support you could be holding under the head instead.
You can then experiment with dropping the hips a little lower if it felt intense or if you want to deepen the pose lifting the hips higher up. If the hands are behind you could be leaning a little back. And the nice thing here again is you can kind of ease your way in and out.
Focus on keeping the rest of your body nice and heavy as you stay here a few rounds of slow and steady breaths. And then you can come out of the pose slowly being gentle with your neck.
Kneeling Backbend With Wheel

You can start by coming to a kneeling position with your hips on your heels. Like in the previous backbends the setup of the upper body is the same with your back close to the wheel.
From here slowly lean back towards the wheel and gradually start to lift your hips up. Again you can start to hold the wheel behind you with your hands and draw your elbows a bit back. Keeping your back supported by the wheel as you arch back. Choosing if you like to reach the arms out to the side or back behind you.
Stay here for around 5-10 breaths and then slowly make your way back up and out of the pose.
Hip Opener With Backbend

Combining backbends with hip openers can help you find more space in the front of your body. Start by sitting with your feet together and knees apart. Again letting the wheel rest against your back.
Hold with your hands the back of the wheel as you roll down to rest your back on the wheel. You could stay here with elbows drawing back or start to reach again arms overhead. Hands either holding the wheel above your head or out to the side.
Stay here for a few breaths and then take your time to gently come out of the posture.
Forward Fold With Wheel
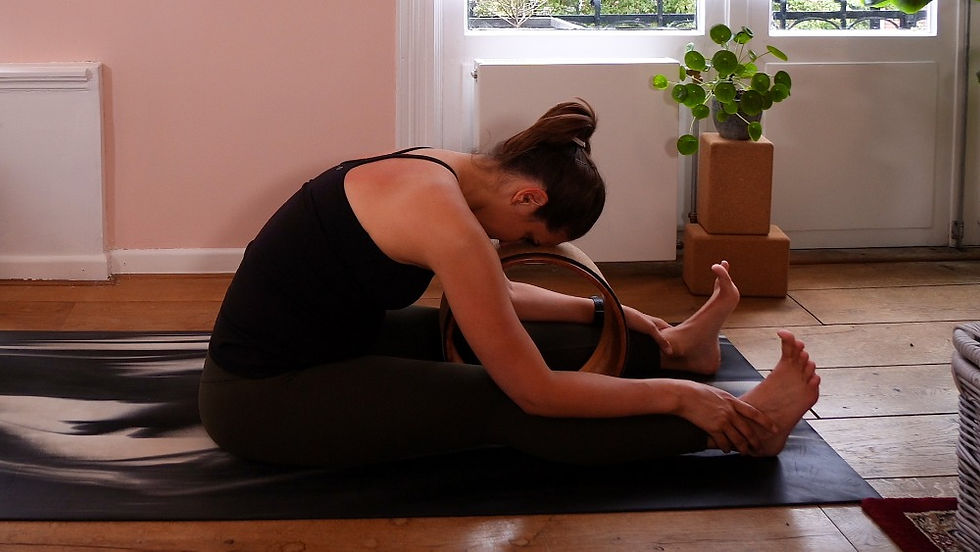
We'll finally just finish with a nice supported forward fold to act as a counterpose after all the backbends. The wheel can be in between your legs to use as a support as you fold forward. You can allow your chest to rest on the wheel. Hands could support your head here or arms could be alongside the body.
If you're feeling you’ve got the space you could bring the wheel a little further forward away from your hips. Or if you're wanting more extra support you could have the wheel on top of your thighs to give extra height and ease the stretch in the hamstrings.
Stay here for 10 breaths or a little longer.
I hope you find these tips and suggestions helpful when exploring how to practice and get the most out of a yoga wheel.
Happy practicing!
💛 Irene

Receive Personal Guidance from Irene
Would you like personal guidance to help dive deeper into your yoga practice?
Email Irene via info@antarayoga.nl to book your free consultation call and discuss what type of private class or corporate yoga would best suit your needs.

Start a Home Yoga Practice
Do you want to develop a home yoga practice but not sure where to start? Follow the three steps in this free guide to start practicing yoga consistently at home.
Complete your details below to receive your free guide with tips for a home yoga practice. In this guide you'll also receive cheat sheets and links to guided videos for seven short sequences, as well as a practice calendar to get started.


Comments