
Poses and Variations to Prepare for Headstand (Sirsasana)
- Irene Lomer
- Apr 16, 2023
- 11 min read
The yoga pose Headstand—known as Sirsasana in Sanskrit—is often referred to as the king of the asanas. It’s one of those iconic yoga postures that a lot of newer yoga practitioners are often either very curious or a bit intimidated to learn.
You might be surprised to learn that the world record for holding the yoga pose the Headstand, Sirsasana is 3 hours and 33 minutes! But in most yoga traditions the Headstand is held for around 10 – 20 breaths which works out as approximately 1 – 2 minutes.
Typically as a beginner you’ll start by learning preparation poses and variations that help build the required strength and flexibility to get into the Headstand. And then start to practice how to balance in the posture and gradually build up to holding and breathing in the posture for a longer time.
We’ll explore a yoga sequence of preparation poses and variations for the Headstand, Sirsasana that you can practice to develop the required technique and actions that you’ll need to learn the posture. As well as looking into some of the benefits and scientific research around practicing the Headstand.
You can follow along with my guided yoga sequence of preparation poses for the Headstand and find more details below about the steps and variations to practice.
Benefits of Practicing the Headstand, Sirsasana
Since yoga has been practiced for thousands of years there are many yogic practices where we have anecdotal benefits that have been documented by yoga practitioners but little scientific research. However, in recent years we have seen an increase in the number of scientific studies available that give evidence about some of the benefits of yoga practices.
One of the first known mentions of the Headstand is in the Hatha Yoga Pradipika, a classical text on yoga from the 15th century.
In many old yoga texts it is mentioned that one benefit of the Headstand, Sirsasana is that it will increase blood flow to the brain. However, research conducted in this area showed that the Headstand does not in fact increase blood flow to the brain.
Despite the fact that this long claimed anecdotal benefit has been shown to not be accurate there are many other reasons as to why you might want to practice the Headstand.
In B.K.S. Iyengar’s book Light on Yoga he also mentions benefits of Sirsasana as a cure for issues around circulation, the common cold, back pain, and depression.
Studies have shown that yoga in general (not just Headstand) can help alleviate depression. And a study on the benefits of the Headstand found that practicing the Headstand, Sirsasana for two minutes (both against the wall and without support) increased the practitioners heart rate variability (HRV) and decreased their overall heart rate.
Yoga Sequence to Prepare for Headstand, Sirsasana
This yoga sequence to help prepare the flexibility, strength, and balance that you will need for practicing the Headstand, Sirsasana.
So even if Headstand feels a little bit out of your practice you can still practice along with these preparation postures and know that during your yoga practice you're working towards the Headstand.
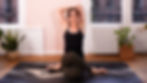
(1) Core Warm Up

We're going to start with working on engaging the core. Finding the strength and engagement in the belly is really essential to find balance and stability in the Headstand.
So by doing a core warm up at the beginning of your practice it will really help you to tap in to where those muscles are for when you need them for the Headstand.
Come to lie down on the back and we're going to set up with the hands in a similar position that we would do for the Headstand.
You're going to interlace the fingers, bring the hands behind your head, and then draw the elbows in and a little towards each other. Lift up the head. So we're lifting a little the shoulders and strengthening through the core here.
You can choose to either have the knees above the hips and legs bent or to extend and lengthen both legs away from you.
Staying here for five to ten breaths and repeating several times.
(2) Child’s Pose Hands Behind Head

The shoulders are another area we need to work on opening for the headstand.
We're going to come into a Child's Pose. So you can bring your knees as wide as your mat and sink your hips back towards your heels.
Arms come out in front. Bend your arms at the elbows, bringing your palms together, and hands back towards the back of your head.
So you’re gently opening through the front of your shoulders and breathing slowly through your nose. Staying here for 5 – 10 breaths.
(2) Low Plank Pose

In addition to opening the shoulders, we need to cultivate shoulder and arm strength. The Low Plank Pose is a great way we can work on strengthening and lifting up through our shoulders while also finding control in our core and legs.
We will practice this posture with our hands interlaced like we need in the bound Headstand. See if you can do this with your little fingers placed next to each other vs. stacking to provide a more stable base of support in your hands.
Bring your elbows down to the ground and start to walk your feet away from you. Allow your hips and shoulders to be roughly in one line. And work on actively lifting your belly up and extending your legs away from you.
Notice if your shoulders have the tendency to sink down and see if you can instead lift up out from your shoulders. Staying in the pose for around five breaths and repeating several times.
(3) Dolphin Pose

Once you’re comfortable with the Low Plank Pose you can work on lifting your hips in the Dolphin Pose.
Start in the Low Plank Pose and start to slowly walk your feet in towards you. As you walk your feet in you want to do your best to keep lifting your hips and keeping your legs (relatively) straight.
Keep engaging your arms and lifting up through your shoulders as you build up to staying in the pose for around five breaths.
You can then pause and rest in Child’s Pose.
(4) Cow Face Pose
Now that we’ve warmed up the body it can be helpful to do another posture working on opening the shoulders.
Come to sitting with your right leg crossed over the left leg. Depending on the openness in your hips you can either keep your left leg straight or also bend your left leg with your left foot coming towards your right hip.
Inhale start to reach both arms up and then exhale as you start to bend your left arm and hold your left elbow with your right hand. Inhale as you lengthen a little your left elbow up. And then exhale you could play with using the help of your right hand to draw the left elbow behind the head. If that feels uncomfortable you can have the left elbow a little wider.
Stay here for around 5 – 10 breaths. And then slowly release and repat on the opposite side.
(5) Supine Big Toe Stretch
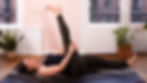
We also need to have flexible hamstrings to be able to walk our feet close enough to be able to come up slowly and with control into the full Headstand. So we’ll use this posture to work on lengthening the hamstrings.
Come to lie back down on the back. Bring your right knee into your chest and extend your left leg away on the ground. From here hold the back of your right thigh and work on extending your right leg away.
Now if it's not so comfortable to keep your right leg straight, you could start with the leg a bit bent and be actively holding the back of your right thigh as you work on pressing the leg away from you and extending and lengthening it as much as feels comfortable.
Pause here for 5 – 10 breaths and then repeat on the other side.
For the Headstand we need to have enough flexibility in the hamstring that it can be at least in a straight in line with the hip to come into the pose. So that's something you can work on practicing over time.
How to Do the Headstand, Sirsasana and Variations
Before progressing to these variations of the Headstand it’s good that you first take the time to really get comfortable in the preparation poses and warm ups. So feel free to keep practicing the above five preparation postures for a period of time before moving towards the Headstand.
If you’re comfortable to progress we’ll now explore a progressive series of versions of the Headstand, Sirsasana that will help you learn how to find a stable foundation and balance in the posture.
(1) Headstand on Forearms

For this first version of the Headstand we’ll be working on the foundation of the pose.
You can come over through the hands and knees. Like we did in the warm-ups, we're interlacing the fingers having both little fingers out flat on the mat. Work on keeping your elbows directly under your shoulders to help keep you steady and also use the structure of your bones to help you stay in place.
Place the crown of your head down on the ground. You will find there is a slightly flatter part of your head that you can balance on. In case you’re not sure where this is you can try first balancing something like a block on your head to help you find the point of your head to place on your mat.
Just like in the preparation pose, you're going to lift up through your hips and really lengthen out through your shoulders. Then you're going to start walking your feet in as far as you can as you lift your hips up. This is where the length of the hamstring is really important.
See if you can bring most of your weight into the forearms not in the head. And work towards staying here for 5 breaths.
You can then slowly release and rest a few breaths in Child’s Pose. If this felt intense, stick with this variation of the Headstand and the preparation poses for a period of time.
(2) Headstand One Leg Tucked

We’re now going to try lifting one leg up into a tucked position. You can start the same way as the previous version of the Headstand.
You're going to interlace the fingers, little fingers are down, and the flat part of your head rests o the ground. Start to walk your feet in as far as you can and allow your hips to stack above your head and shoulders.
If you can allow yourself to be right up on the tips of your toes. And then see if you can start to tuck one foot in and keep the other foot lightly on the ground.
After staying here a few breaths you can repeat on the other side and then take some time to rest in Child’s Pose.
(3) Headstand Both Legs Tucked

If it felt ok balancing with just one foot lightly on the ground, the next step to explore is with both legs tucked. This is the first time we’re trying to have both feet off the ground and truly balance on our head, and forearms.
Set up from your hands and knees. Bring your elbows in and head down. Keeping your neck nice and long as you walk your feet in as close as you can.
Start by coming right on your tippy toes and tuck one leg in, followed by your second leg. Seeing if you can keep pressing your elbows down and lifting up out through your shoulders. Building up to staying here for around five breaths. You can then slowly release and come out of the pose.
By coming up in this way into a tucked position, you will find a lot more stability than if you try to kick up and probably roll immediately out of the pose from the other side.
(4) Headstand With One Leg Extended

One you’ve found your balance in the tucked position you can start to work on extending one leg up.
So the setup is again the same. Once more dropping your head down, walking the feet in, keeping the elbows nice and close. Tuck in one foot and come to your halfway tuck with the other foot too.
See if you can then lift one leg up as slow as possible. Really drawing the strength and balance from your belly here. As you work to balance for around five breaths.
You can then slowly come out and try again reaching the opposite leg up.
If this feels tricky at first you might try being close to a wall and then work slowly on coming down with one leg extended and one leg tucked. This will help you find more control in the posture that you can then use to find your balance without a wall.
(5) Full Headstand, Sirsasana

After having found your balance with one leg extended and one leg tucked, the next step is to work towards extending both legs for the full posture. Now this progression may take several weeks, months or even years to move from that tucked position to lifting up.
Take your time again setting up your solid foundation and walking your feet towards you. Finding your way first to the tucked Headstand posture and then seeing if you can slowly lift both legs up to the ceiling.
Keep engaging your belly and lengthening your legs up towards the ceiling. Seeing if you can allow your breath to slow down and deepen.

Once you’ve got familiar with balancing in the full posture you can also start to experiment with coming out of the posture with straight legs. This will help you learn to exit the posture with more control and also eventually learn to come into the pose with straight legs.
To do this you can start to firm your belly as you draw your hips back and lower the legs down as slowly as you can towards the ground.
Keep in mind that coming out of Headstand, Sirsasana with straight legs requires quite some openness in the hamstring.
Headstand Counterpose Sequence
Like any intense and challenging yoga pose, its helpful to follow your practice with a few counterposes.
(1) Child’s Pose

One of the best counterposes for the Headstand is the Child’s Pose. It allows you to ease tension out of your shoulders and neck.
Feel free to add in Child’s Pose between each variation of Headstand that you practice. Staying in the pose for long enough to allow your body and breath to relax and slow down.
(2) Spinal Twist

I like to use a Spinal Twist to gently open the body and help prepare for Savasansa.
You can come onto your back. Hug your right knee into the chest. Bring your right knee over to the left and reach your right arm out to the right. Eyes could close here, and head can turn to one side.
After around 10 breaths slowly come through the middle and repeat on the other side.
(3) Savasana

Finally you can come to rest in your Savasana. You can let your feet fall open to the side and your palms to face upwards.
Allowing your eyes to close, body to relax fully and breath to soften. Staying here and relaxing for anywhere from 1 – 15 minutes.
Headstand Tips for Practice
I hope you went through this practice at your own pace and kind of really listen to your body. Particularly if the Headstand is new since there are a lot of things happening here and it is a challenging posture.
I would recommend that you first work on getting comfortable with practicing the Shoulder Stand since it is a simpler and more accessible inversion. This will help you get familiar with balancing on your upper body and allowing your legs and hips to be above your shoulders.
The Headstand can then be a really nice complementary posture to practice before or after the Shoulder Stand.
Often when you're learning a challenging pose like the headstand it can be helpful having the feedback and comfort of using the wall. So feel free to have a wall behind you if you like.
Just try to avoid kicking up into the wall because that won’t help you to work on finding that foundation and balance.
Also, if you're using a wall you want to make sure you have a little bit of space between your hands and the wall so you can work on balancing in the pose away from the wall as soon as possible.
You will also find if you learn how to roll and fall out of the Headstand in the middle of the room it will really help take away some fear that might be there about falling out of the pose.
Please remember that the full Headstand, Sirsasana is an intermediate level posture that requires both flexibility and strength developed in a regular yoga practice. So feel free to take your time getting familiar and comfortable with the preparation poses for Headstand before attempting the full posture. And if you can get guidance from a yoga teacher when learning the posture for the first time.
Happy practicing!
💛 Irene

Receive Personal Guidance from Irene
Would you like personal guidance to help dive deeper into your yoga practice?
Email Irene via info@antarayoga.nl to book your free consultation call and discuss what type of private class or corporate yoga would best suit your needs.

Start a Home Yoga Practice
Do you want to develop a home yoga practice but not sure where to start? Follow the three steps in this free guide to start practicing yoga consistently at home.
Complete your details below to receive your free guide with tips for a home yoga practice. In this guide you'll also receive cheat sheets and links to guided videos for seven short sequences, as well as a practice calendar to get started.